Showing posts with label my kids. Show all posts

Sunday, March 27, 2011

Closet Progress

I completely forgot to show you the work I had done in my closet before the inspector came.

Sorry!


I took down this row of hooks.

I know it's just a closet, but screwing some hooks into a 1x4 just seems lazy to me.

Like my mom says:
"Do it right the first time or just don't do it at all."

It's solid advice, really.


So I routed the edges, primed and painted it, and reattached the hooks.

I don't have a picture for you. I'm going to wait 'til the closet is fully done.


Then, my oldest helped me out in the shop to build a door.


Those hinges are awesome. They are old cast iron hinges that were in my grandpa's workshop.
I picked them up the day before I took this picture.
What luck, hey?

My grandma is moving out of her house, so we're clearing everything out.
I have some pretty awesome antique tools.


The doorknob was also free. I was looking for something in my workshop, and I ended up finding the little wooden knob.

I still have to paint the door, though.
It's going to be painful to paint. You know how much I love birch grain. I'm going to hate covering up such beauty, but the door would look best white.


I still have a lot of work to do in the closet. However, it probably won't be done until after the Spring semester, in a little less than 2 months.

I was really hoping to knock it all out during Spring Break, but that didn't happen.
I need to buy a whole new box of floor planks, because I'm one plank short.
They don't sell individual pieces, either.
See it in the left corner?


And of course I can't put in the baseboard until that piece of flooring is down. I don't want to paint the door trim (those are primed pieces) until the baseboard is up.


List of closet stuff to do:
-paint the door
-finish the flooring
-put in the baseboard
-wood putty the nail holes and paint all the trim
-put up the wall hooks
-build a light box to cover the fluorescent tube lights
-build a shoe/purse cubby area

I'm also going to be building some utility shelving inside the utility part of the closet for paint cans.
It will be much easier than tripping over everything in our messy basement.


On another note, we had a taste of Spring in our area. Most of the snow was gone, my flowers were poking out of the ground, the birds were chirping.
Then we had a crazy nasty snowstorm.


But we're in full Spring mode anyways.
The snow will melt eventually.
;)

Sunday, October 31, 2010

Roasted Pumpkin Seeds

Nothing says "Halloween" to me more than the smell of pumpkin seeds roasting in the oven.

My fondest memories with my dad was gutting pumpkins and saving the seeds to eat.
He did a lot of special things like that.

Now I have passed that tradition onto my children.

Spiced Roasted Pumpkin Seeds

-raw pumpkin seeds
-few drizzles of olive oil
-few splashes of Worcestershire sauce
-a dash of salt

Mix everything together. Spread a thin layer on a cookie sheet. Put in the oven at 275 degrees for about an hour.
I used roughly 2 1/2 cups of seeds. The more seeds you have, you will need to add a bit more of the other stuff. I can't give you exact amounts, I just throw everything in there!

My kids were eating these by the handful!

It's such a nutritious treat, especially after a day scarfing down candy.
;)


Happy Halloween!


Saturday, October 30, 2010

Ooops!

Shoot, I forgot to let everyone know that I received a clean bill of health from the doc!

Yay!

I've been covered in sawdust for the past 2 days on 2 seperate yet equally awesome projects.

They will both take me a while to finish, but I'll be sure to show you some mini-projects along the way!


And because no post is complete without a picture, I'll show my son's epic "Double Pick."

Awww. He was just a baby.

:'}

Friday, October 22, 2010

More Fall Kids Projects

I don't decorate for the seasons much.
I'll throw Christmas decor up a week before Christmas and take it down the day afterward.

But Fall....

...oh how I love Fall.


Here's a few more Fall-themed projects to do with your kids.

Stuffed Pumpkin

1. Cut out a circle in some orange felt.
2. Punch holes around the perimeter of the circle with a paper punch.
3. Weave some green ribbon through the holes.
4. Pull slightly on the ribbon until the felt makes a bowl shape.
5. Stuff the bowl with cotton.
6. Pull the ribbon tight and tie off.


Painted Pumpkin

 This one's pretty self-explanatory.
Just paint a pumpkin (or a mini-gourd, like we did).
My daughter chose purple.
<3

Fall Trees


This one is probably best for school-age children that are able to follow directions better......

Anyways, just trace your child's hand (you can use brown construction paper and cut it out like we did on the right).
Make Autumn leaves by either gluing on fake leaves, or using finger paint to paint them on.


Posts that I'm dreaming up for the future:
-A peek at some woodworking I've been doing (but won't be able to show you until after Christmas!)
-My Fall "mantle"
-A spinach recipe the kids will love!
-A 10-in-10 recap


Wednesday, October 13, 2010

10-in-10 Day 1 & Kiddy Ghost Project

Here we are at the end of Day 1 on my 10 projects in 10 days challenge.
Day 1: Winterize the outside.


Mmmmmkay.
I brought some potted plants in.
I flipped the birdbath and planters.
I started taking the arm cushions off my wicker patio furniture.

This guy jumped out at me.


Done.


After making the hubby carefully check every single cushion for "friends," I now have a pile of cushions that need to be washed before stored.

Did I get all the winterizing done?

No.

But it's a good start.


Anyways, I have a cute Halloween project that you can do with your kiddos.


Paint the bottom of your kid's foot with white paint.

Press firmly onto black construction paper.

Add googly eyes and draw a ghoulish smile.

Hang and enjoy your ghost!

Tuesday, October 5, 2010

U.P Autumn

There's something about the Fall in Upper Michigan.
It's my favorite season.
Hoodies
Crisp Air
Pumpkin pie
Football

What's not to love? Not only that, but Fall comes early around these parts. The leaves have been sporting a magnificent red for weeks and weeks now.
(Okay, but that means that Winter also comes early. Ick.)

Though my schedule has been busier than usual this last week, due to a presentation, I managed to squeeze in quality time with the family.

So what do you do for fun during Autumn in the U.P?

Go to a corn maze, of course!


And go on hay rides.


And play in a "corn box."


We had a great day in Wilson, MI.


If anyone's from around my parts, Getzloff's Corn Maze is amazing! It only cost us $23 for our entire 5-person family.

Not only that, but they have the cheapest Autumn yard decor:


Pumpkin: $2
Hay bale: $3
Corn stalk: $4


You'll know your heading in the right direction if you pass this sign:


Haha. I love the U.P.


Happy Autumn everyone!


Thursday, September 23, 2010

Picaso


My daughter loves to draw.


She's the new family artist.


I know that she's just trying to help Mommy make everything pretty.


Luckily Magic Eraser takes everything off.


Actually, I'm not even mad that she drew on the kitchen walls.


And I'll tell you why in a few days when I reveal my latest project!


On a completely unrelated note, I am forever grateful for all of the support I receive from each and every one of you.
You gals are my rock!

 Unfortunately, it has come to my attention that one of my readers (not listed as a Follower) is not so supportive.

Let me explain:
1. She makes fun of my Facebook status updates.
I update my friends/family on what I have done or will do in my day. I'm a very busy mother. My day is very busy. She believes that it's a bragging tool.
No.
It's to keep my real friends/family up to date on my life because it's the only way I keep contact with them.

2. She discovered my blog, and made fun of the "Superwoman" title.
First off, it's okay for me to name my blog whatever I want. Secondly, Superwoman, to me, is my journey to become just like my mother, who has always been my idol, my "Superwoman."

The intentions of this blog is not to brag about my life, it is to give tricks/tips/recipes/funny stories to the rest of the world. I like sharing what I know or what I have done to inspire my readers.

I know this doesn't pertain to mostly any of you, but I thought I would clear this up right away.

My advice for any haters:
If the only reason you hate me is because of my accomplishments, then you should go out in the world and make your own accomplishments.
Stop dwelling on mine.....


....or at least stop reading my blog.

;)

Thursday, August 12, 2010

Built-In Desk

Wow, has it been an interesting few days.
I will explain after I show you my latest project:
Hailey's built-in desk.

My daughter is my youngest/final child. If anyone is the youngest, you know that you generally get last pick on everything.
When I was pregnant with my daughter, the boys moved into bigger rooms. Hailey got stuck with the smallest.
To make it fair, I gave her a second room. Her two rooms equal the size of one of the boys' rooms.
It's still a pretty small space, though.

If she is to get new furniture, I have to keep in mind how it will fit in her room.

I wanted to give her a desk. I thought this space would be perfect for a built-in.

Actually, I thought it would be a great place for a hamper, but since her dresser is in her 2nd room, it would make more sense to keep her hamper next to her dresser.


So I moved the shelf down to a desk height...


...patched the wall...


...and painted it.


I knew I wanted an extra shelf to hold supplies.
I also wanted to keep this a NO COST project.

I found this shelf in my basement.


It used to be in my living room.


You know I wouldn't just throw away a perfectly good floating shelf.
;)

So I cut the sides off the shelf to fit the space.


It got a coat of primer and a coat of white paint.


(Note: All paint used are my leftovers. I now have barely any reserve paint left =P)

Since I cut the ends off the shelf, I also cut off the hangers. But the back is hollow.


All I needed to do was make supports for it.
So I cut three pieces of 1x2's in the same lengths as the shelf's open pockets.


I predrilled holes in them.


And hung them up on the wall level with each other.


I secured it onto the supports with wood glue.
I also found hooks in my garage bins. 5 were screwed into the bottom of the shelf.


You will get to see that in a bit.

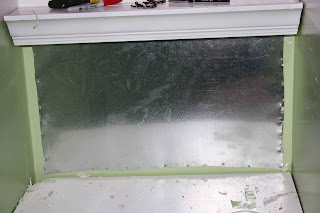
Anyways, I also had some flashing just hanging out in my garage.
(I know, I know, I hang onto everything.)

I cut it to size and nailed it onto the wall.


Now of course I couldn't keep those sharp edges there. It would need trim.

I found a perfect-sized trim next to my potting bench.


You can see a little bit of the shelf here as well. The hooks weren't in when I took this picture, though.

Anyways, I pulled up a chair from my basement. It belonged to an old desk that we no longer use.


I took the seat and back off....


...and gave it a coat of primer and a few coats of white paint.


Do you remember these ugly pots from the herb garden?


Here they are getting primed...


...to become art supply holders.


Ready for the grand reveal?


And then, after two days of hard work...dripping sweat everywhere in HOT weather...

...my daughter decided to draw all over EVERYTHING with PERMANENT MARKER!

I...was...pissed.

It was all over the walls (that took me days to paint when I was pregnant with her.)

It was all over her new shutters.


It was all over the new desk that I just spent two days making.


I didn't take any pictures of it. I went into over-drive trying to fix her artwork.

For your amusement, here's what it basically looked like:


I just got done restoring everything to its formal glory.


And do you know what's the kicker?
My daughter's had an issue with drawing on walls since she could walk and hold onto a crayon. I built this desk to give her a safe place to let out her creativity.


Ironic, no?


Needless to say, those supply buckets will not be holding any "permanent" supplies for a long time!


Share |
Related Posts with Thumbnails