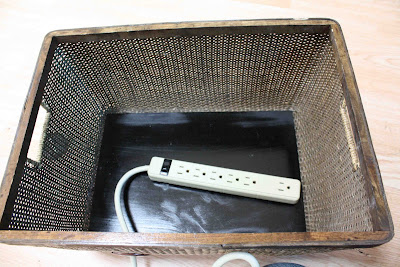
So what did I do with this simple basket?
First, I went to Hobby Lobby to find this basket. They have a huge selection, and I knew I would find one with about the measurements of the shelf.
Wait until the flier says they are 50% off!
I used the template that came with the bronze grommets that I used.
I placed the template where I wanted it, then traced with a white paint marker (easier to see).
After cutting the basket with wire cutters (the basket was too thick for scissors), I glued on the grommets.
They need to be glued because a basket is obviously thicker than fabric, so the grommets won't snap together.
Don't skip this step, because the grommets help the basket from unraveling!
Put a power strip inside the basket....
....and thread the cord through the grommet.
Then I attached two ledgers on each side.
I screwed the wood from the outside of the basket with black screws to have them camouflaged a bit.
I did this because my basket would be in an enclosed space, so you won't be able to see the screws.
If you are having the basket sit out on a table, you will need to find a different way of securing the wood to the inside of the basket, unless you don't mind seeing the screws.
Wood glue might work, but it may ooze out of the basket....
Anyways, just make sure that the two wood ledgers are level with each other, and that you leave enough room for not only the power strip, but all the plug-ins that you will be adding!
Next, place your basket upside-down on a sheet of wood. I used a scrap 3/4" plywood that I had from a previous project. You can definitely use a thinner plywood!
Trace around it.
Now, if your basket is beveled, like mine (the bottom is smaller than the top), you're going to need to cut on the inside of your line, so that the wood fits further down the basket.
If you don't do this, the wood will sit on the top of your basket.
I had to take about an inch off all the sides.
After cutting that out, you will need to make several straight cuts along one side, to thread the cords through.
I accomplished this with my table saw, but a circular saw or jigsaw should do the trick. I made two passes per line to thicken up the line. You may have thick cords!
That's a bit hard to see. it seems as if the wood is the same color as my floor.
Ooops!
Anyways, put the power strip back in the basket and attach any charging cords that you may have.
I only put our cell phone chargers in there, but I have a bunch more for cameras/GPS's/etc.
Place the wood in the basket, thread the cords through the slits, attach your power strip to an outlet, plug in your gadgets, and your all set!
I will definitely be staining that wood.
I'm also thinking about adding tags to each cord so that we don't have to guess which one is the right cord. Masking tape wrapped around the cord should work fine!
You wouldn't even guess that's the function of this cute little basket on our entertainment center!
<3
I think this may be my favorite organizing project to date.
We used to plug our phones into an outlet by the countertops in the kitchen. That means gadgets would be in my way as I cooked. Not only that, but there was only 1 free plug, so it was a constant battle between my husband and me. I would have to unplug his charger, neatly wrap it up, stick it in the junk drawer, then plug mine in. He would unplug mine, throw it "God knows where," and plug his in.
Now I know where my charger is.
;)
Hubby's favorite organizational project to date is the magazine storage in the bathroom.
He's odd.
Haha!


Super cute!
ReplyDeleteThis is one of the best ideas I have seen in a while. Thanks for sharing.
ReplyDeletetotally SMART project! Our entertainment cabinet is just one giant mess!
ReplyDeleteGenius idea! We stick our ohones on the counter and the cords drive me crazy! Love this solution! The magazine rack is too funny! Hope you are enjoying your weekend! ~ Stephanie Lynn
ReplyDeleteLOVE this idea! Thanks so much for sharing!
ReplyDeleteBTW...I featured it here:
http://thecreativecrate.blogspot.com/2010/11/creative-charging-station.html
Thanks again! :)
Love this!!!
ReplyDelete{Rebekah}
{Speechless} I have been needing something like this for a LOOOOOONG time. I will be making one. Thanks for the idea!
ReplyDeleteMe again. Where did you get your entertainment center?
ReplyDeleteOkay Brittany I am amazed!! Wow!
ReplyDeleteCome and see my latest find! Would love your thoughts....
Karena
Art by Karena
What an awesome idea!!! I'll be trying this soon!
ReplyDeleteYou are a genius!! And your hubby too!! Those are two really fabulous ideas!!
ReplyDeleteThanks for all the nice comments!
ReplyDelete