
Okay, my cousin's baby shower is over, so there's no threat of her seeing her gift before she got it. So I'm going to show you how to make a diaper cake!


Hint: You may need to use masking tape you keep the layers in place, and to also secure the cake to the cardboard cake plate!

A little side note---I noticed that there were a lot of repeat entries to the giveaway. After studying it for a bit, I realized it was my fault.
Let me explain:
I should have said "First vote, Second vote, Third Vote" instead of "1 vote, 2 votes, 3 votes."
Though it was DEFINITELY my mistake, I need to delete some repeat posts to make it a fair game for everyone.
Sorry to anyone/everyone for the confusion!

Diaper Cake
-------------
Supplies:
-1 pkg size 1 diapers
-an 8 oz bottle
-a 4 oz bottle
-things for fillers (bibs, onsies, pacifiers, etc)
-basket wrap
-ribbon and/or twine
-scrapbook paper
-cardboard cake plate
Put down your cardboard cake plate as your template. Make a slipknot on some twine. This will hold your diapers as you add more. Place the 8 oz bottle in the middle of your cake plate. Start adding your diapers, overlapping just a part each time. Make sure all your diapers are facing the same way!!

You can also tuck in extra goodies once you have the diapers established. This is a good way to add bulk without having to buy another package of diapers!

Once you've gotten a decent girth to it, tie a decorative ribbon around the twine, covering it. Once it's secure, you can pull your twine off.

Start your next tier the same way as the first. It should end up being smaller than the first.

Then make the 3rd tier. It should be the smallest tier. Make sure you are adding the ribbon to each tier!

Then you can begin on the flowers. Cut individual flowers off of a bunch and stick them on the tops of each tier. Then stick them around the bottom of the cake, and lastly, on the very top.

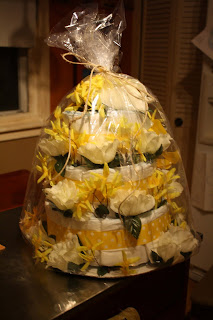
You should end up with something like this...

Then wrap it up in your basket bag and tie off the top with either twine or ribbon. I chose twine.

Then you need to make the tags.
I had this one from a scrapbooking page. This is where I will put the "To and From"

Then I chose this card stock to make my "ingredients" list.

I cut off a strip...

Folded it in half...

Then I wrote my "ingredients":
-bottles
-2 bibs
-short sleeve onsie
-long sleeve onsie
-footed pants
-diapers: size 1
(whatever you stuck in the cake)
I punched a hole in the top, tied the two with the twine, and I had my diaper cake!

Hint: You may need to use masking tape you keep the layers in place, and to also secure the cake to the cardboard cake plate!
Have you entered the giveaway yet?? If not, click the image below! It ends this Friday night! Don't miss out!
Let me explain:
I should have said "First vote, Second vote, Third Vote" instead of "1 vote, 2 votes, 3 votes."
Though it was DEFINITELY my mistake, I need to delete some repeat posts to make it a fair game for everyone.
Sorry to anyone/everyone for the confusion!


This is so cute. I am giving a baby shower for a treasured friend and want to do this for her! Thank you for sharing.
ReplyDeleteI needed to see how this is done...I'm giving a baby shower next month and I thought about doing this...thanks soooo much...it looks soooo PURDY!!!!
ReplyDeleteBlessings,
Linda
I love it. That is the cutest one I've ever seen. Thanks for the great tutorial!
ReplyDelete~Amy
I've made these before. I always love giving them as a gift.
ReplyDelete