I like being handy.
It's much cheaper.
There's a lot of things, however, I'm not so handy with.
Electricity is one of them.
Sure, I can install a new light fixture easy enough, but other than that, I'm lost!
So when I mentioned to my super-handy always-generous step-dad that I needed to relocate a light in my bathroom, I figured it was like free labor.
Right?
Right?
No.....
See that light next to the painting? What an odd placement....plus it's also a fan (which vents into my clothes closet! Ew!)
So my step-dad came over, looked at it for a while, tapped on the walls with his knuckles for a few minutes, looked at the wall, then the ceiling, then the wall again.
After doing the random "tests" that I didn't understand fully, he told me where I could find all the tools in his garage necessary to complete this project, and then how to do it.
Wait....what?!
I was bewildered, to say in the least, but I knew that if I didn't complete this project, the rest of the bathroom remodel would never get done.
So here's my light.
I took off the cover, which just snaps on.
At this point, I thought it was probably best to shut down the power to the light and use a shop light for the rest.
Electrical shock doesn't tickle.
Trust me...
Take off the lightbulb to expose the screw.
Unscrew it, and the whole light-housing should come out easily.
This is plugged into a receptacle similar to a wall outlet. Just unplug it and the entire light part should come out.
There will be more screws holding the fan in. Unscrew them and the fan should come out easily as well.
At this point, I realized that this particular fan was installed with extending arms going to each stud, which means that the fan was installed before the drywall, making it impossible to easily get the rest out.
I would have had to get at the screws holding it onto the studs, but I couldn't do that without damaging an entire section of my wall.
So I grabbed my trusty hammer and pry bar and beat the fan box into submission.
With enough denting, I was able to pry the entire unit out of the wall with minimal damage.
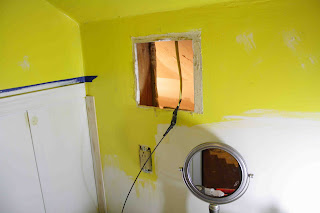
And here's the view from inside the adjacent closet.
For the wires to go up into the slant of the roof, then up to the ceiling, I needed to drill a hole in the header.
I then drilled a hole in the ceiling where I wanted the light fixture.
Place your light receptacle box exactly where you want it on the ceiling, trace around it, then cut along your line with a drywall saw.
Make sure that one side of the box is touching the stud in the ceiling, because you will need to anchor the box to the stud after you pull in your wires!
At this point, you can begin fishing your line up into the wall.
Since the roof is slanted, and both holes (on the wall and the ceiling) were between the same studs, it fished easily to the ceiling hole.
Just stick your hand up into the ceiling hole. Have someone else fish the line up, and wait until you feel the line on your hand. The person fishing the line might have to "jiggle" it a bit so that you can feel it.
Grab it and yank it through the hole.
Loop your new extension wiring over the loop on the fishing wire.
Tape all around the wires and the fishing wire. Don't make it too bulky, though, because you want it to be able to fit through the hole on the wall!
Tape it well enough so that you're sure it won't come apart behind the drywall!
Now start pulling on the fishing wire, and your new wires will move into the wall. Leave enough wires to be able to complete your lighting project comfortably.
This is the end that you will attach to the old wiring. Just follow the colors. White to white, black to black. Secure each wire with a cap then wrap with electrical tape.
This is what you should have on the ceiling.
Mount your electrical box to the stud, pull your wires through (securing the wires with the screws! You'll know what I mean if you see an electrical box), and strip the insulation off the wires.
Then it's all set to install your new light fixture!
This hole on the wall can be patched up!
It seems like a lot of work, and slightly confusing, but if you break everything down step-by-step, it really wasn't that bad.
Now, looking back on it, I'm very grateful that my step-dad made me do this project on my own. I learned a great new skill, and I have the pride that I did this project myself.
And, of course, I now have a whole list of electrical projects that I want to take on!
Never ending...


No comments:
Post a Comment