Saturday, February 25, 2012

Update

Hey everyone, I just wanted to stop in quick to give a little update.

I haven't been around much, lately. My school schedule has been pretty easy lately, so I've actually had some time to post projects.

After my last semester, I received my PN diploma. I haven't taken my LPN boards, though, because I see no point since I am continuing on in my education. If for some reason I am no longer able to attend school, I can always take my boards then.

I'm saving myself the $250 for the license.

So the actual reason that I haven't posted anything is that I no longer have the laptop that kept all my pictures. And, no, I didn't back up any files. I'm lazy.

I have an IT guy at my mom's work that says that he can 95% likely fix my computer, or else retrieve everything from the hard-drive.

The up-side is that this fiasco made my husband and I to purchase a new laptop, which we so desperately needed.

So, long story short, I will be posting my two newest remodels as soon as I have my pictures back.

Since my blog will be pretty quiet until I do get my laptop back, you can always follow me on my Pinterest page to get updates on ideas or projects I have in mind.

Ciao!


Wednesday, January 11, 2012

Featured: Or So She Says


My gumball-maching-turned-fishbowl was featured on "Or So She Says."

Click here to check out the feature!

Monday, January 9, 2012

How to Fish Wires Through Walls

I like being handy.

It's much cheaper.

There's a lot of things, however, I'm not so handy with.
Electricity is one of them.

Sure, I can install a new light fixture easy enough, but other than that, I'm lost!


So when I mentioned to my super-handy always-generous step-dad that I needed to relocate a light in my bathroom, I figured it was like free labor.

Right?

Right?


No.....


See that light next to the painting? What an odd placement....plus it's also a fan (which vents into my clothes closet! Ew!)


So my step-dad came over, looked at it for a while, tapped on the walls with his knuckles for a few minutes, looked at the wall, then the ceiling, then the wall again.

After doing the random "tests" that I didn't understand fully, he told me where I could find all the tools in his garage necessary to complete this project, and then how to do it.


Wait....what?!


I was bewildered, to say in the least, but I knew that if I didn't complete this project, the rest of the bathroom remodel would never get done.


So here's my light.


I took off the cover, which just snaps on.


At this point, I thought it was probably best to shut down the power to the light and use a shop light for the rest.

Electrical shock doesn't tickle.

Trust me...


Take off the lightbulb to expose the screw.


Unscrew it, and the whole light-housing should come out easily.


This is plugged into a receptacle similar to a wall outlet. Just unplug it and the entire light part should come out.


There will be more screws holding the fan in. Unscrew them and the fan should come out easily as well.


At this point, I realized that this particular fan was installed with extending arms going to each stud, which means that the fan was installed before the drywall, making it impossible to easily get the rest out.

I would have had to get at the screws holding it onto the studs, but I couldn't do that without damaging an entire section of my wall.

So I grabbed my trusty hammer and pry bar and beat the fan box into submission.
With enough denting, I was able to pry the entire unit out of the wall with minimal damage.


And here's the view from inside the adjacent closet.


For the wires to go up into the slant of the roof, then up to the ceiling, I needed to drill a hole in the header.


I then drilled a hole in the ceiling where I wanted the light fixture.


Place your light receptacle box exactly where you want it on the ceiling, trace around it, then cut along your line with a drywall saw.
Make sure that one side of the box is touching the stud in the ceiling, because you will need to anchor the box to the stud after you pull in your wires!


At this point, you can begin fishing your line up into the wall.


Since the roof is slanted, and both holes (on the wall and the ceiling) were between the same studs, it fished easily to the ceiling hole.
Just stick your hand up into the ceiling hole. Have someone else fish the line up, and wait until you feel the line on your hand.  The person fishing the line might have to "jiggle" it a bit so that you can feel it.
Grab it and yank it through the hole.


Loop your new extension wiring over the loop on the fishing wire.


Tape all around the wires and the fishing wire. Don't make it too bulky, though, because you want it to be able to fit through the hole on the wall!
Tape it well enough so that you're sure it won't come apart behind the drywall!


Now start pulling on the fishing wire, and your new wires will move into the wall. Leave enough wires to be able to complete your lighting project comfortably.

This is the end that you will attach to the old wiring. Just follow the colors. White to white, black to black. Secure each wire with a cap then wrap with electrical tape.


This is what you should have on the ceiling.


Mount your electrical box to the stud, pull your wires through (securing the wires with the screws! You'll know what I mean if you see an electrical box), and strip the insulation off the wires.


Then it's all set to install your new light fixture!


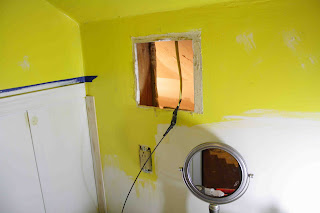
This hole on the wall can be patched up!


It seems like a lot of work, and slightly confusing, but if you break everything down step-by-step, it really wasn't that bad.


Now, looking back on it, I'm very grateful that my step-dad made me do this project on my own. I learned a great new skill, and I have the pride that I did this project myself.
And, of course, I now have a whole list of electrical projects that I want to take on!
Never ending...


Tuesday, December 20, 2011

Character

"Character is what we do when no one is watching."

I love that quote.
It says a lot.
Most of us behave well when we are under watchful eyes, but how do you behave when you think no one important is watching?


Let me share a story with you:

     I was driving my daughter to her preschool today, since my daughter's afternoon bus driver is recovering from a surgery. I noticed that the morning preschool bus driver pulled out behind me. In no time, this bus was mere inches away from my bumper. Inches. I checked my speedometer: 30mph in a 25mph zone. I was already going enough over the speed limit. I wasn't about to speed and get a ticket just to please this crazy lady.  I was getting agitated really quickly. It takes me about 15 minutes to drive my daughter to school. Ten of those minutes I was close to getting into an accident. "If you're in such a hurry, either go around me or choose a different route!"
     I thought about tapping my breaks to scare her off. Nope. Couldn't do it. My daughter was in the back of the van, and the bus was so ridiculously close that even just tapping the breaks would have caused an accident. The bus would've been the winner in that accident.
     So I drove the rest of the way, my road raging bus trailing me. I pulled into the preschool parking lot, unloaded my daughter, and began trekking up the path to the school. We had to pass the bus parking on the way. The look on the bus driver's face screamed, "OH CRAP!"  I admit, I was a little smug after seeing the look on her face.
     So then the internal battle began. Do I say something? I hate being a tattle-tale. I don't want to ruin this woman's life. What if this job is the only thing supporting her family? If I don't say something, though, will she do the same type of driving with 20 children in the bus? How would I feel if she were my child's bus driver?
     In the end, I chose to write a formal complaint. My reasoning: I asked myself what any respectable parent would have done in that same situation.
     The bus driver is a grown woman. She chose her actions. She never would have driven that way had her supervisor been with her. She also is well aware of the consequences.
     My concern is the safety of all the children. The children that she buses now, and possibly my own child next year (she's in 3K right now).
     Character is what we do when no one is watching, and she thought no one was watching.


Always be proud of your actions.

Always.


Monday, December 19, 2011

DIY Lipgloss

I'm not a lipstick wearing gal.

I've tried several times, but I always think I look silly wearing it.

But lipgloss....I can't go a day without it!

You can use your favorite lipstick colors for the base of a DIY lipgloss, giving you just a hint of the color.


For this project, you will need:
-An old Altoids tin
-Beeswax
-Vasoline
-Oil of essence (I used Spearmint)
-Lipstick


1. Cut the lipstick and the Beeswax into chunks about the size of a thumbnail and put in the Altoids tin.
2. Fill the rest of the tin with Vasoline
3. Add about 10 drops of the oil. I added a little more for a stronger scent.
4. Place on a cookie sheet and bake in your oven on the lowest temperature. Mine goes down to 175.
5. Wait until all of the wax and Vasoline is melted.
6. Take it out carefully and stir it to get the color and flavor evenly distributed.
7. Let cool overnight.


I found this idea at this website:

But I found that the recipe wasn't the greatest. It made the lipgloss WAY too hard.
So the recipe above is my own little concoction, after a few attempts.
I hope you enjoy!

Share |
Related Posts with Thumbnails